
When looking to begin backpacking you will begin to read and hear terms you may be very unfamiliar with. One of the big ones you will want to learn and pay attention to is the backpacking big three, so what are backpacking big three?
The big three are your backpack, sleep system, and shelter. They are called the big three as they will make up the majority of your weight and are the most expensive gear on average for a backpacker. These are where you MUST focus to drop significant base weight.
Why is so much effort put into the big three gear for backpacking and hiking, well they are basically the biggest items that will dictate your backpacking base weight.
What Are The Big Three?
The backpacking big 3 will in large part dictate your overall base weight as most the other gear you purchase from clothing to cook system all weigh very little in comparison.
This is why you want to also provide the largest section of your gear budget directly to the purchase of these items in almost all cases. This will have a direct impact on the weight you have to carry on your back and legs.
Sometimes you will hear the bug three referred to as the backpacking big 4, this is more due to the growth in sleep systems including pads as a split option due to the need to adjust them for conditions but they mean the same thing fundamentally.
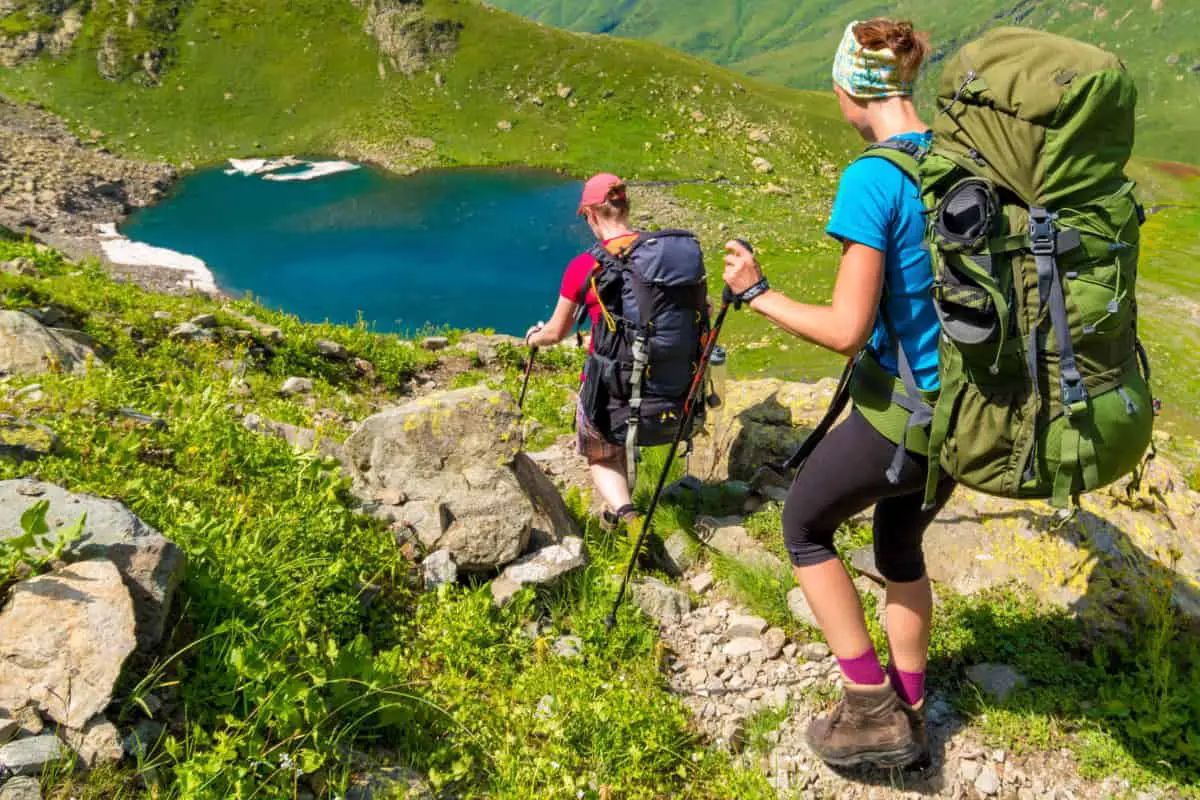
Backpacks for Backpacking
You will want to think of your backpack as the core gear item as it contains everything else you choose to purchase. This means it has to be large enough to hold all your gear as well as durable enough to carry the weight and take the abuse.
In addition you will need to think about the structure of the backpack as some will prefer having a backpack with a frame to help distribute the load, especially when you carry heavier loads over longer times.
To Frame or Not to Frame That is the Question
The most common backpacks for many will be framed backpacks, though many of these framed packs are now framed internally instead of externally to keep them much smaller and tighter.
A frame can help you distribute the weight in the backpack across your body with more ease. This can also help you as you don’t have to structure your gear in your pack with the same thought that a frameless pack will need.
Frameless packs are frameless, they have no internal structure to make the pack shape, they instead will rely on the packing of gear to build a structure and balancing the addition of gear is vital to comfort.
Liters Capacity Rating
Your backpack will come with two different ratings which will matter to your overall packing ability, the liters and the weight.
The liter measurement is the volume of space inside your backpack that can be used to store your gear, this is important as many parts of your gear can take up more space than their overall weight.
For example, many ultralight backpackers can use a 30-40L backpack to carry their much smaller gear, where many thru hikers will settle on a 60L backpack to carry all their gear and additional clothing and accessories.
Weight Capacity Rating
This is the capacity of weight that the backpack is rated for, for comfort and to function without gear failure occurring. Many people will push this weight limit but you need to understand this can cause issues with carry.
Weight is a limiting factor for you especially when you consider your overall base weight, then add on your consumables at around 2 pounds per day for food and water at 16oz per pound the weight can add up fast.
Shelters for Backpacking
Your shelter for most people will come in around 3 pounds, as you choose to get lighter you can find options that near the 1 pound mark but the cost to lessen weight increases very fast.
We say shelter as opposed to tent as many hikers and backpackers will choose to use a hammock, tarp, or tent. Each of these will offer their own benefits and drawbacks to the user.
Tent Backpacking
The most common shelter for most will be a tent, they are still a favorite of many backpackers due to the overall privacy they provide on the trail along with a nice place to relax after a hard day of hiking.
Many traditional tents will come with poles but this increases the weight, in more recent times the rise in trekking pole tents has helped to cut weight by using your backpacking trekking poles as the structure for your tent.
As to materials tents have a wide variety available with the lightest being made from Dyneema Composite Fabric, like these from Hyperlight Mountain Gear.
The other two primary fabrics you will hear are sil-nylon which is a treated nylon, and sil-poly which is a treated polyester. Both of these have a good cost to weight which is why they have become a mainstay in the business.
Hammock Backpacking
Hammocks are kind of unique as they requires you to have trees or objects to mount the straps to for the setup. This makes them of limited use depending highly on the type of terrain your hike will take place in.
The benefits to hammocks are that they tend to be more comfortable as you are lifted off the ground, also they ensure you are kept away from soggy, wet ground.
Hammocks generally are very light by themselves but when you are looking at a backpacking setup for a hammock you have more that needs to be a part of your complete setup.
For most this will be a bug net, rainfly or tarp, underquilt, along with an overquilt. Then you add in the straps and additional minor gear and the weight can add up fast.
Tarp Backpacking
This is for the hardcore and people who are willing to push themselves to the limit, a tarp will only provide a ceiling and a direction for overall top protection.
This means you need to understand weather concerns along with needing to know how to best setup your gear in all spaces as you want to make sure you keep yourself out of water path of travel.
This can drop you to an amazingly lightweight shelter weight, many will choose this option if they are hiking from shelter to shelter along trails when the tarp is a fallback only for when a shelter can’t be reached.
Sleep Systems for Backpacking
Your sleep system will be what keeps you warm on the trail, a shelter is really to keep you out of the elements not to keep you warm. This means focusing on whether you want to use a quilt or a sleeping bag and what pad to pair them with.
Temperature Rating Guidelines
When you are looking at purchasing a sleeping bag or quilt you want to understand what temperature rating they are showing you as there is three different temperature ratings and they will make or break your trips.
Comfort Level Rating
This level is defined as the lowest temperature at which a person in a relaxed position (i.e. lying on their back) is not feeling cold. It is very often NOT the temperature listed on the sales page and this needs to be understood.
Limit Level Rating
This is defined as the lowest temperature at which a person in a curled-up body position is not feeling cold. Hot sleepers, or folks who plan to layer, can look to this number.
Extreme Level Rating
This is the temperature at which there is risk of health damage by hypothermia. Some people also prefer to call it the “survival rating”.
This is a useful thing to know for emergencies, but it’s not recommended to buy a sleeping bag intending to use it at its extreme temperature.
Sleeping Bags
The old guard for many is the sleeping bag, these are a staple of camping trips for generations but have started to show their issues and limits.
A sleeping bag is typically much more heavy than the sleeping quilts, this is due to the fully enclosed build and the zipper running the length of the bag.
These are still more preferred for four season backpacking to ensure you are fully covered head to toe, along with the mummy hood on many sleeping bags this helps to keep as much heat inside as possible.
Sleeping Quilts
Sleeping quilts are the favorite for many backpackers and thru hikers as they can provide similar warmth to a sleeping bag but at a dramatically decreased weight.
This weight is cut due to the removal of the zipper and the removal of the useless fabric that is located underneath your body. This area under you with compressed down provides you almost no heat retention at the cost of weight.
With quality options from US companies like Enlightened Equipment, Hammock Gear, and Garage Grown Gear they are definitely something you need to learn to adjust to as you can cause breezes if you move too much and don’t use or buy the straps.
If you want to look at a more exhaustive list of quilts check out our quilt compendium here.
Sleeping Pads
A sleeping pad is what helps to insulate you against heat loss to the ground, many people when they feel cold while camping aren’t losing heat to the air but to the ground.
When looking to 3 season backpack you want to look at having a sleeping pad with a 3-4 R-Value, this is the value of insulation the pad provides to you. A favorite for many is the Thermarest Neoair Xlite and the Thermarest Neoair Uberlite which are warm and weigh very little.
If you move into four season backpacking then you want to increase this to around 7+ to ensure you are able to keep that heat in and not lose it to the ground.
In What Order Should You Purchase the Big 3?
For many they may just approach purchasing their gear in whatever order they can afford them, though this is a poor approach. You may find that you have size issues or weird shaped gear that you must account for in your purchases.
When purchasing gear for your big three order does matter, typically you want your backpack last after you purchase your shelter and sleep system. The reason for this is you can then ensure your backpack can easily fit the two other items by capacity how you want them to fit, I prefer horizontally.
As I said above, I prefer to build a horizontal stack of gear in my backpacks personally and I DISLIKE GREATLY having items placed vertically, so I made sure after purchasing my sleep system and shelter to find a backpack that can fit them horizontally perfect.
Why the Backpacking Big Three Weight Matters
If you are trying to make a backpacking trip easier on your body over the long haul you want to limit the weight you carry. So with all this being said what makes for a good weight for big three backpacking?
For most backpackers you want this big three weight to be under 12 pounds at a minimum, though if you are looking to move to lightweight this number should be closer to 9 pounds or under. Last is ultralight weight which looks to get these under 6 pounds to get you under 10 pounds in base weight.
Focus on investing into these gear items as it will pay off in the weight much more than cutting off the handle of your toothbrush or other similar minor weight cutting tactics.
Final Thoughts on the Backpacking Big Three
You can find your big three for costs as low as $100+ to $1000s depending on what you are needing for yourself and your budget. While the gear that costs thousands can be amazing it isn’t required for an enjoyable experience.
I tend to worry less about what others think of my gear and more about the functionality I want and need for my trip balanced with the safety and costs this way I maintain a budget mindset.
I will continue to upgrade my big three much more then my other gear as it gives me the biggest overall drop in base weight which is what I need as I get older and wiser.
This focus also ensures when I get to camp I am less beat and my legs ache less which allows me to relax and enjoy the evening instead of fighting aches and pains of a hard day of labor.