
If you are new to thru hiking and are starting to get to grips with all the terminology and phrases you may have heard “the big four” mentioned before. Well, today we are going to explain this and help you understand what this means and why it is so important to any thru hiker.
What Are the Thru-Hiking Big Four? The big four represent the core of all thru-hiker gear which is typically the heaviest and most vital gear. The four parts are your backpack, sleeping bag, sleeping pad, and your shelter. Each of these three will exist in almost every bag and need to be primary in gear selection.
Why would these four be your primary need in backpacking when you could just simply cowboy camp in the open? The purpose of the big four in your backpacking gear is to maintain safety and keep you free from the elements.
What Are the Thru Hiking Big Four?
Since the big four encompass your backpack, sleeping bag & pad, and shelter we can start to dig into each part of the three. This should help you when trying to make the decision on where and how to spend your money to ensure you spend on the parts which will yield you the best results.
The biggest reason the big four are so important
When beginning backpacking you more than likely have no gear so the first thing on your list is one of the most important, your backpack.
Backpack
The main gear, the article you purchase which is what helps carry everything else you add to your gear. The backpack is an important thing to focus on first as it will determine the amount pf pack weight you can carry and will limit the amount of internal space in which to hold it all.
When choosing your backpack you may believe you need a specific size but you should think through additionally how you would store the other gear you purchase.
Things like can it fit your tent horizontally or will it take up space vertically, while these seem silly the can be very important for how you can fit all your gear within the pack. Let’s explore what the measurement system is with backpacks so you can make a more educated decision on what size a pack will fit your needs on a trip.
What Is The Backpack Liter Measurement?
This measurement is the actual internal storage compartment area the backpack provides for storing your gear. This number can help you gauge what total gear you will be able to carry and the size and weight it must be to allow you to take it on a trip.
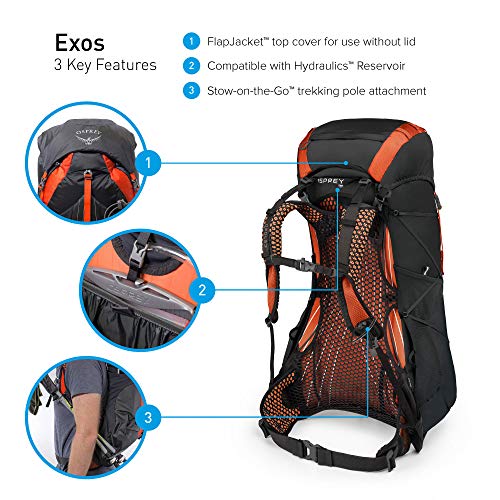
Below is the Exos from Osprey, a quite popular backpack in a nice size (48 Liter) which is good for pretty much any hike you may want to take, from a day, week, section or even thru-hike.
While most people, including yourself, may believe a larger number then is a safer choice many times this isn’t helpful to you. Many people when given space will take and bring unnecessary gear or equipment which will encumber you and could add to pain and discomfort over a multi-day or longer hike.
Sleeping Bag or Quilt
This is the next important decision to make as it will depend on where you plan on hiking and what the anticipated weather will be. This is where you will get the most warmth from your gear setup, choosing a high R-Value pad if you will be in cold environments will provide you much more comfort!
As to a quilt versus a sleeping bag, this is a more personal choice which depends on the type of sleeper you are. Since I roll around a lot I prefer quilts as they are open and better suited to someone who doesn’t like a confined feeling.
Example quilt from Enlightened Equipment, the Revelation, which is a good 3-4 season quilt for backpacking.
[lasso ref=”ee-revelation-link” id=”962″ link_id=”4956″ rel=”ee-revelation-link”]
The drawback to the quilt is that since it is so open you really would like a better sleeping pad to help you contain the heat so you lose less to the ground. Sleeping bags due to being closed in nature tend to help hold in heat much more reliably if you are a super cold sleeper.
Sleeping Pad
Just as important as your sleeping quilt or sleeping bag is your choice of sleeping pad. The sleeping pad is your protection from the ground and the overall heat lost from the constant contact with the floor on your tent.
Many who buy a lower temperature sleeping bag or quilt really actually have an issue with losing heat to the ground while the are hiking and backpacking. Instead if you change your focus and find a well insulated pad (at least 2.5+ for 3 seasons) the better your overnights will become and the warmer you will sleep.
I am currently using the Paria Outdoors Recharge XL which is rated at a 4+ and it helps me as it inflates to about 4: thick allowing me to be a side sleeper and not to grind my hip or shoulders into the ground!
Shelter
Your shelter is something that can be tweaked to help you fit a specific weight or need within your chosen hike. Many are used to a normal tent as a primary shelter and this is a normal choice as it provides you 4 walls, a floor, and a roof over your head.
The downside to a tent is typically it has a lot of weight included with the safety of having a compartment. Though if you have the budget for it with the Dyneema fabrics available you can get amazingly ultralight tents from companies like Big Agnes, Zpacks and more.
There are two other methods which, depending on you and your needs can work out well while also cutting a lot of weight and bulk from your pack. The two I am speaking about are the hammock and the tarp tent.
The Easthills Outdoors Jungle Explorer hammock showing use in the forest areas and how simple it can be to use

A hammock is a bed that is strung between trees to help get you off the ground but not provide walls. These normally are used with a cover or tarp to ensure no dew or rainfall ends up on the hammock and in your face.
Below is an example tarp setup from Go Outfitters Apex Camping Shelter
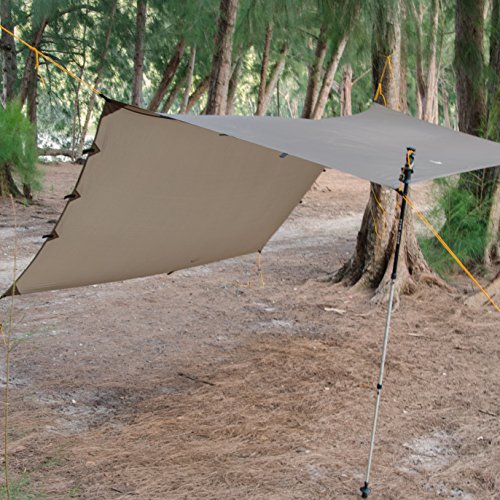
The other option is a tarp tent, these are more typically used when in favorable weather conditions as they are more a roof over your head. They have no walls and no flooring unless you bring a groundsheet in addition, obviously, this works better in warmer weather hiking areas.
How to Pick Your Big Four
The best way to figure out what your choice on the big four will depend on weight and budget. These will make up a very large chunk of your backpack gear and will make up most of your non-cuttable pack weight.
Since these are the most expensive to replace and are the biggest in terms of weight if you have a budget they should get the majority of the money spent as they will yield the highest value for the cost.
If you are looking for budget gear I have a nice guide on building a budget ultralight backpacking gear setup which comes in at about $500. This can help you get a strong start in life aiming towards carrying gear that is functional and gives you extra weight allowance to carry a luxury or two like maybe a chair.
Final Thoughts on the thru hiking Big Four
I love that you are starting to look at the big four for backpacking and want to hear from the readers! I hope this helps you to shed some light on why you should think and have a plan when looking at making your big four purchases.
Please feel free to contact me if you have anything you would like to hear about or to have me cover in-depth. I love to cover content the readers like and always respond to everyone who emails if I am out on a trip though I may take a little bit to reply!
